
Foreword
I recently reorganized my blog's image hosting workflow.
To some extent, this has been a long-standing issue for me (
When I first started blogging, I initially used Imgur, which was quite popular and a major image host at the time.
However, at some point, probably starting last year, Imgur began experiencing frequent connection issues in Taiwan. Sometimes it was even blocked, requiring a VPN for normal uploads.
I later switched to other image hosting services. For a period, I used imgpoi.
At the time, I thought it was quite good; the interface was complete, and it even had a simple photography feel to it.
But good times don't last. After only a short period of use, imgpoi experienced a host storage failure, and all image links disappeared, unrecoverable. Fortunately, I'm habitually behind schedule and hadn't written too much yet.
So after that incident, I started looking for alternatives.
Having your own image hosting is always better, but it needs to be trustworthy, or at least as free as possible ((
After reading several articles and shares, I noticed more and more people are starting to use Cloudflare R2 as their image hosting solution.
After some research, I found it quite suitable for a personal blog:
- The free tier is quite generous, you can bind your own domain, CDN, and Cloudflare handles the infrastructure, resulting in low maintenance costs.
So I decided to gradually move my entire blog image workflow to R2.
However, it's not without its drawbacks. After all, it's essentially tied to your Cloudflare account.
If issues arise later with the account, credit card, etc., BALALA
In terms of long-term preservation, it's theoretically not as good as dedicated archival image storage solutions.
But for a small user like me, it seems sufficient for now.
This article will briefly document some setup procedures
and share a small tool I designed, Cloudflare R2 Image Uploader, to address the hassle of uploading images for blogging. It allows one-click organization and upload of images to R2, along with compression, saving me many steps in the image upload process (though my habitual procrastination still persists, lol). This app actually has some additional humorous origins, but I'll save that for later. XD
Let's start with hosting Cloudflare R2 Storage.
Setting Up Cloudflare R2 Image Hosting
1. Create a Cloudflare Account & Enable R2 Object Storage Service
First, register an account at Cloudflare.
If you're already using related services like Cloudflare DNS, CDN, Tunnel, etc., you probably already have one.
Cloudflare is quite generous.
After logging in, find it on the left side:
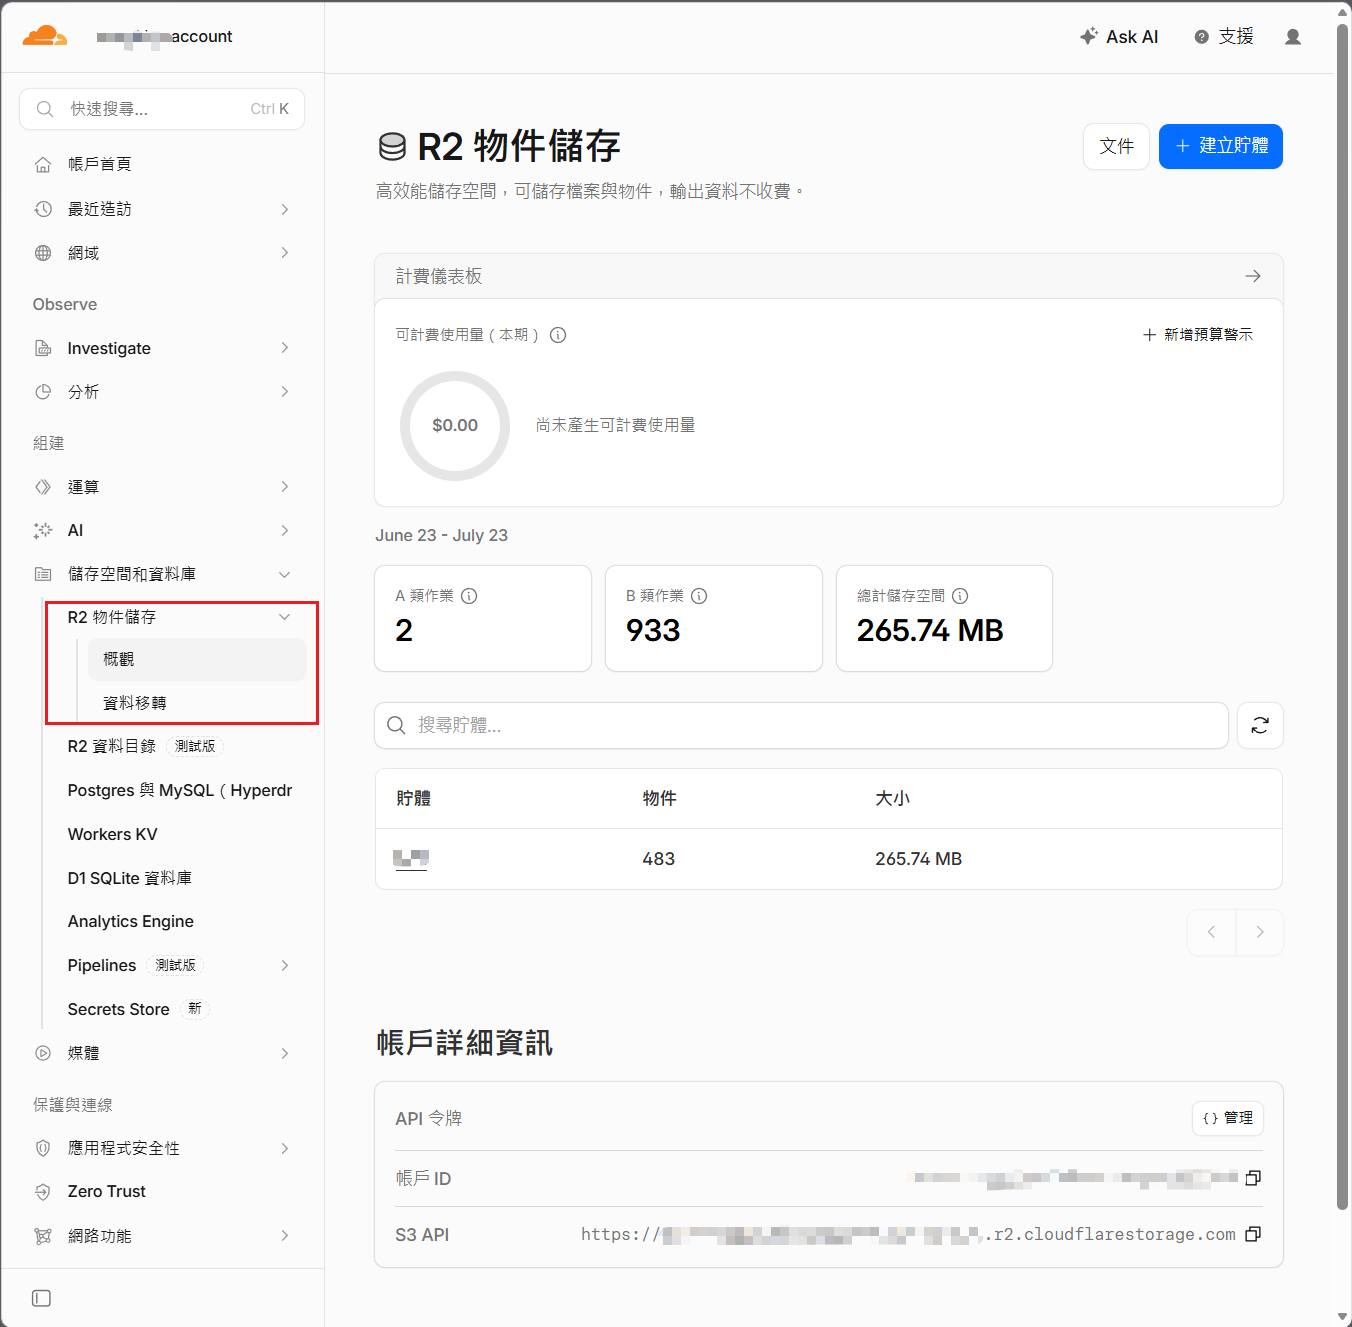
The first time you enter, you'll need to enable the service. Just follow the steps.
3. Create a Bucket & Bind Custom Domains
Click "Create" on the screen to set up a Bucket (aka. storage container). You can choose an easy-to-remember name (e.g., img, cdn...), and here you can configure a Custom Domain for production use.

Then click on settings, where you'll see the basic R2 configurations and your S3 API location, which will be used later.
4. Bind Your Custom Domains (optional but recommended)
I highly recommend this step, otherwise the default URL will typically look like this: https://pub-xxxx.r2.dev/xxx.png.
It works, but having your own domain is much more comfortable, for example: image.setsal.dev.
The specific steps are as follows:
Enter the created bucket -> Click Settings -> Custom Domains
Binding your Custom Domain for production use is straightforward; just follow the settings.
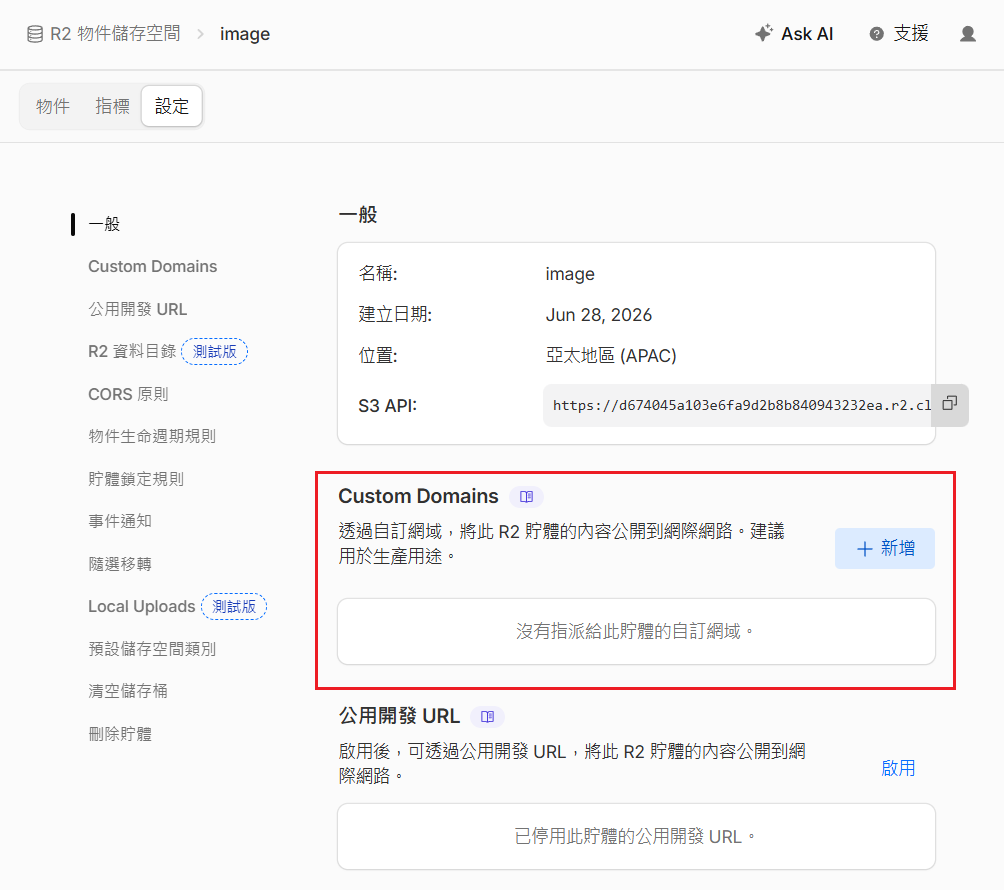
After this, your image URLs will become https://image.setsal.dev/xxx.png.
If everything goes smoothly, you can now access your buckets and upload new files directly using Cloudflare's built-in page. Then, by appending the uploaded file name to your bound domain, you can access it.
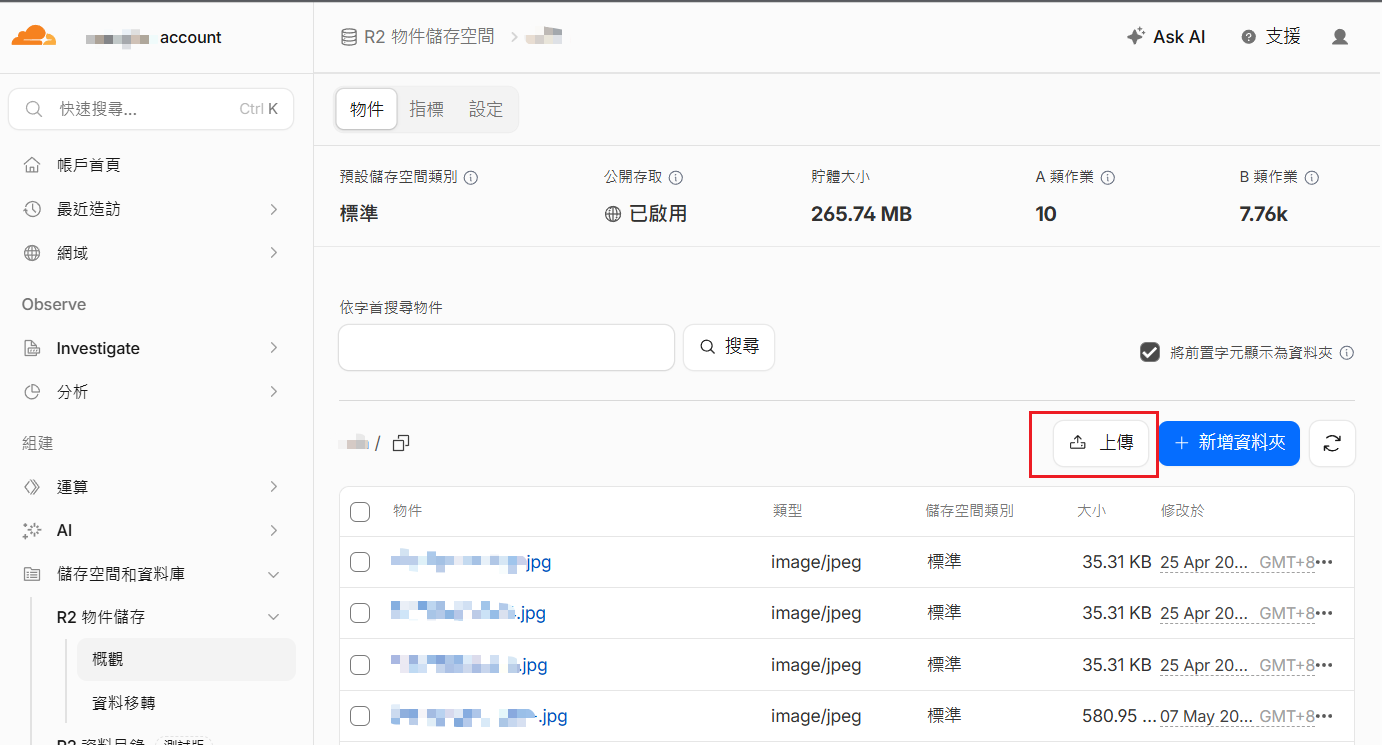
You can try uploading an image here first, then test accessing it via the URL.
However, if you want further automation and to use my small r2-uploader for uploads, you can refer to the following.
5. Create an API Token
Naturally, to integrate, you'll need to create an API Token.
Return to the R2 homepage overview. You should see detailed information below. Click API Tokens to create one:
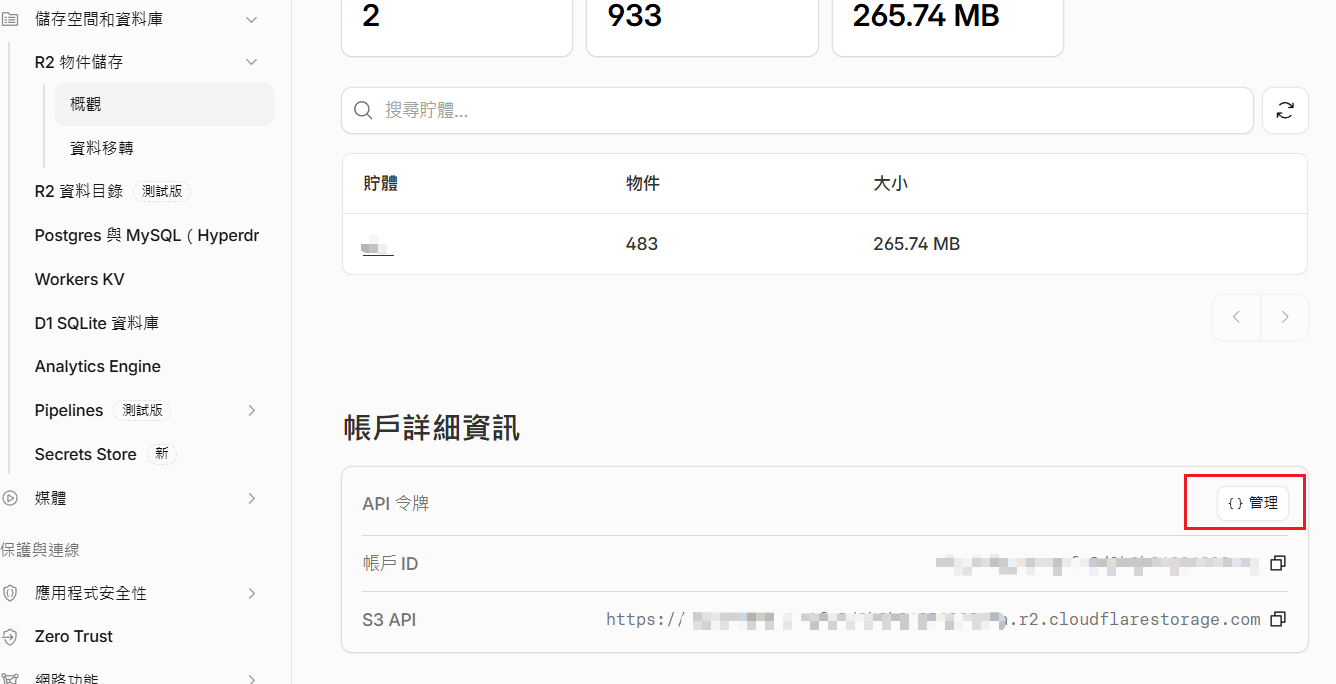
Click to create an Account API Token. You can set permissions for object write and read. "指定貯體" (Specify Bucket) essentially means "bucket," allowing you to decide whether this token should be tied to a specific bucket.
Once configured, you will obtain:
- Access Key ID
- Secret Access Key
These values will only appear once at this time, so remember to save them securely; they will be used by r2-uploader later.
You can also note down the specific endpoint URL; that's essentially the S3 Endpoint. But it's fine, you can find it again on the homepage.
Uploads will be made from this endpoint.
7. Upload Images Using the Cloudflare R2 Image Uploader App
Now you can start using the uploader.
Go to the Cloudflare R2 Image Uploader GitHub release page.
Download the installation file for your platform. After opening the app, click the Settings Tab.
Fill in the information you just obtained:
S3 Endpoint, Access Key ID, Secret Access Key, Bucket Name, Public URL Base (which is the full name of your bound Custom Domain)
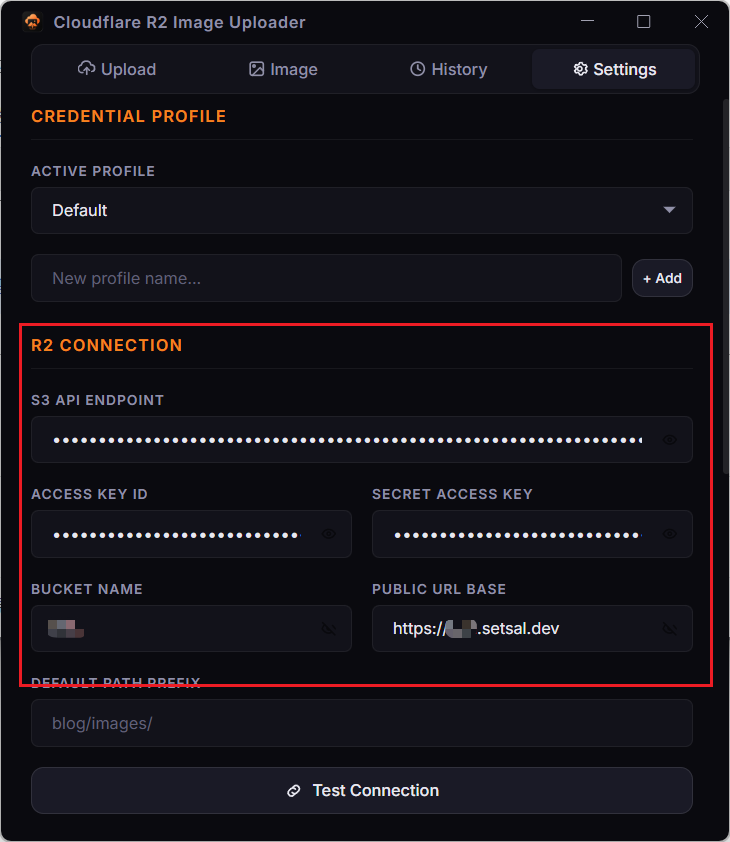
Finally, click "Test Connection" at the bottom. Once the connection test is successful, you're basically done.
Happy Uploading? :)
Next, let's briefly introduce more features of the designed app, primarily aimed at accelerating the entire image upload process for blogging.
Cloudflare R2 Image Uploader: Image Upload and Compression Tool
I'm tempted to just paste the GitHub README here. If you're interested, you can visit https://github.com/setsal/cloudflare-r2-image-uploader to check it out.
I primarily developed this tool because when I used to write blog posts, I had to go through several tedious steps:
- Organize photos, make minor color adjustments, and even save them again.
- Resize + Compress (after all, images for a blog shouldn't be too large... otherwise, photos taken nowadays are really huge. Previously, I mainly used the free caesium-image-compressor).
- Rename.
- Select the compressed files and upload them to image hosting websites (e.g., Imgur).
- Right-click to copy the image URL and paste it back into the blog.
It was quite annoying, especially since I might want to paste images while writing, so these steps would multiply by N.
With the Cloudflare R2 Image Uploader, these steps can be directly eliminated.
Workflow
After setting up the APP Connection Settings earlier,
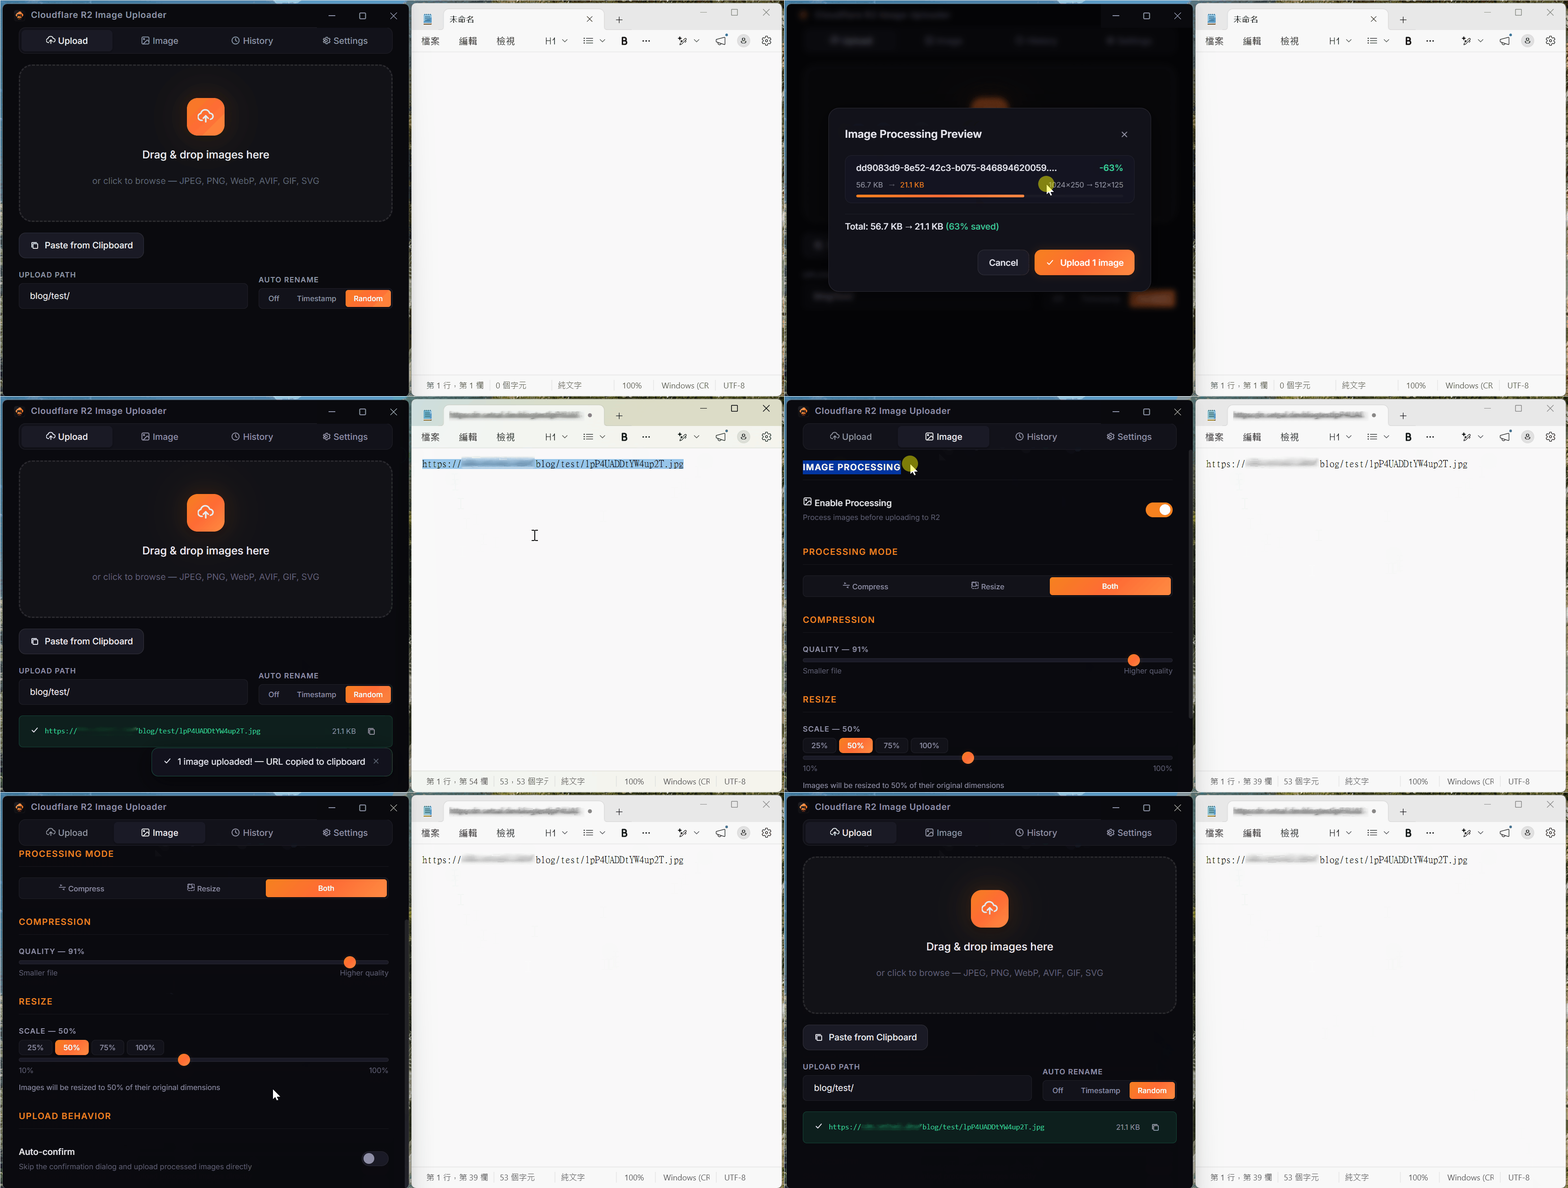
Select your images, then simply Drag & Drop OR Paste From Clipboard.
That's it, everything is done.
If the feature is enabled, the image URL will also be automatically copied to the clipboard, allowing you to directly switch to your blog afterward.
APP Features Introduction
I've basically implemented everything I thought of and wanted for my personal needs. Here's a brief list:
| No | Feature | Comment |
|---|---|---|
| 1 | Drag & Drop Upload / Clipboard Upload | N/A |
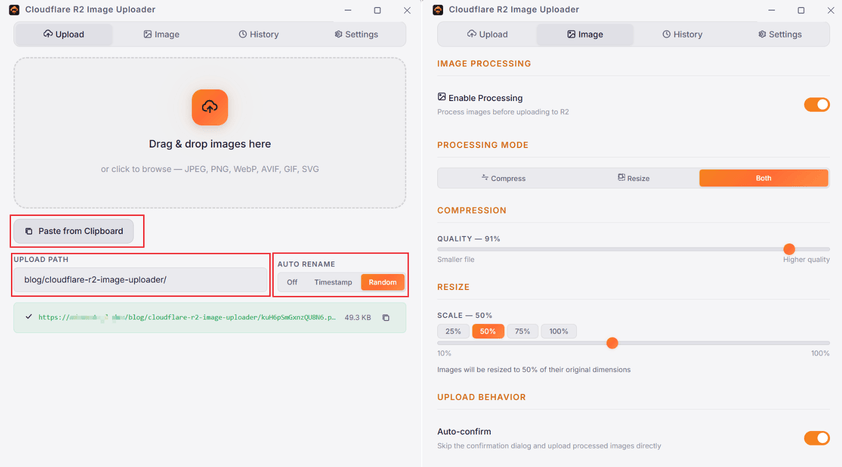
| 2 | Custom Upload Directory | Freely specify the destination folder for the current upload, facilitating subsequent organization and classification. |
| 3 | Auto Rename | Automatically rename files upon upload to enhance path security. |
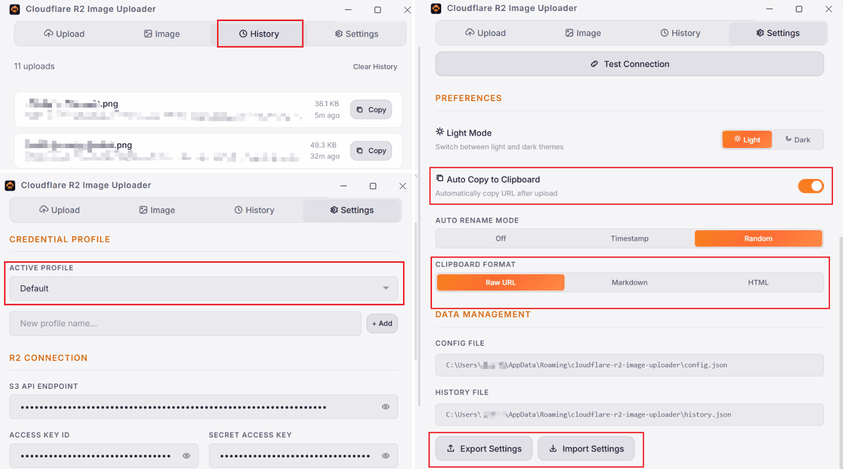
| 4 | Auto Copy to Clipboard | Automatically copy the link after upload, supporting RAW, Markdown, and HTML formats. |
| 5 | Custom Resize + Built-in Compression | Provides image resizing and compression functions, including preview and automatic confirmation mechanisms. |
| 6 | History Access | Records past upload history. |
| 7 | Profile Switching | Supports quick switching between multiple different buckets or configuration settings. |
| 8 | Dark Mode | Dark mode is a must these days. |
| 9 | Settings Export/Import | Export settings for backup or import existing configuration files. |
| 10 | No Tracking | Contains no tracking code, suitable for independent personal use. |
| 11 | Cross Platform | Cross-platform, although not yet thoroughly validated across all platforms :P |
Download Address
Just grab it from the GitHub Release Page.
https://github.com/setsal/cloudflare-r2-image-uploader/releases
Other Fun Facts & Origins
Actually, after switching to R2, I also wondered if there were similar apps to help. Initially, I came across some quite well-known ones in the community:
Both can be used together. PicGo itself is more like a framework and supports custom plugins to achieve more.
I initially used PicGo, and basic usage was fine, but I still struggled with the following:
Compression/Resize: I still had to do this manually, and it involved two steps (first compress, then select the compressed file).- The original
caesium-image-compressorfor Windows had a bug that prevented percentage-based resizing. PicGoindicated that usage would be tracked, which made me a bit uneasy.- Other minor feature settings were inconvenient (specifying upload directory, format, S3 plugin settings were a bit unintuitive).
After using it for a while, my computer's SSD died. After replacing it, I intended to continue using PicGo, but for some reason, even though all my R2 settings were correct, I couldn't upload. And I couldn't debug PicGo/plugin s3 either.
So I decided to build one myself, also benefiting from AI-accelerated development.
I included the features I understood to be most essential, without needing it to be as massive as PicGo.
As for the fun fact?
After completing everything, I realized I had misunderstood some of the access key values to be filled in for the PicGo S3 plugin... haha.
But ultimately, it helped me create an app with all the features I wanted, so it was a blessing in disguise, I guess. XD
Conclusion
So that's about it. Just wanted to share and document this.
This article concludes here. See you in the next one, if fate allows.